🌿 BOTANY – Green Nature v7 🌿

Modern educational application for Windows 10 and 11

Methodical support

Ferns – methodological support for teaching

This methodology demonstrates how the Botanika – Green Nature application can be used to deliver a clear and structured lesson focused on ferns. The lesson connects explanation, work with visual materials, interactive elements and knowledge assessment within one environment, with emphasis on understanding fern structure, reproduction and the principle of alternation of generations.

Topic Ferns (Polypodiopsida)
Time 45 minutes
Format Explanation + activity + test
Usage Interactive board and student devices

Quick start

  1. Launch the Botanika – Green Nature application.
  2. Open the “Ferns” section from the main menu.
  3. Follow the methodology step by step; depending on classroom equipment, choose board-based teaching or independent student work.

Objectives

Fern structure

Students identify the main parts of ferns, especially the rhizome, leaves and sporangia, and can recognise them in images or diagrams.

Reproduction

Students explain reproduction by spores and understand the role of the gametophyte in the fern life cycle.

Alternation of generations

Students understand the principle of alternation of generations and can describe the basic stages of the fern life cycle in their own words.

Modes

Option A – teacher-led instruction

The application is used by the teacher on an interactive board or projector and the teacher leads both explanation and shared activities.

  • suitable for classrooms without individual devices
  • supports structured explanation of complex processes
  • effective for shared practice and guided assessment

Option B – active student work

Students work independently or in pairs on their own laptops or tablets.

  • allows individual pace
  • supports active learning and exploration
  • encourages pair and group collaboration

Teacher tip

For most classes, a combination of both modes works best: start with a shared explanation on the board, clarify fern structure and the alternation of generations, and then move to independent student work with plant representatives, questions, tests or the botanical key.

Flow

0–5 min Motivation

Introduction and activation of prior knowledge

The teacher introduces the topic, briefly explains the lesson objective and activates prior knowledge through a short guided discussion. It is useful to connect with students’ experience from nature, gardens or previous biology lessons.

  • brief introduction of the topic and lesson objective
  • connection to familiar examples from previous experience
  • explanation of how students will work with the application
  • clarification of expectations for the lesson
Questions:
• Where have you seen ferns in nature?
• In what environment do ferns usually grow?
• How do you think they differ from flowering plants?
• Do ferns have flowers or seeds?
Option A: The teacher presents the introductory screen and guides a whole-class discussion.
Option B: Students open the topic and in pairs identify familiar examples of ferns or describe where they have encountered them.
+ Advanced: Ask students to suggest additional habitats where ferns grow and describe their characteristics.
– Support: Focus on one or two known examples and clarify that ferns are not flowering plants.
The introductory screen helps quickly establish the lesson topic.
5–15 min Explanation

Group characteristics, structure and life cycle

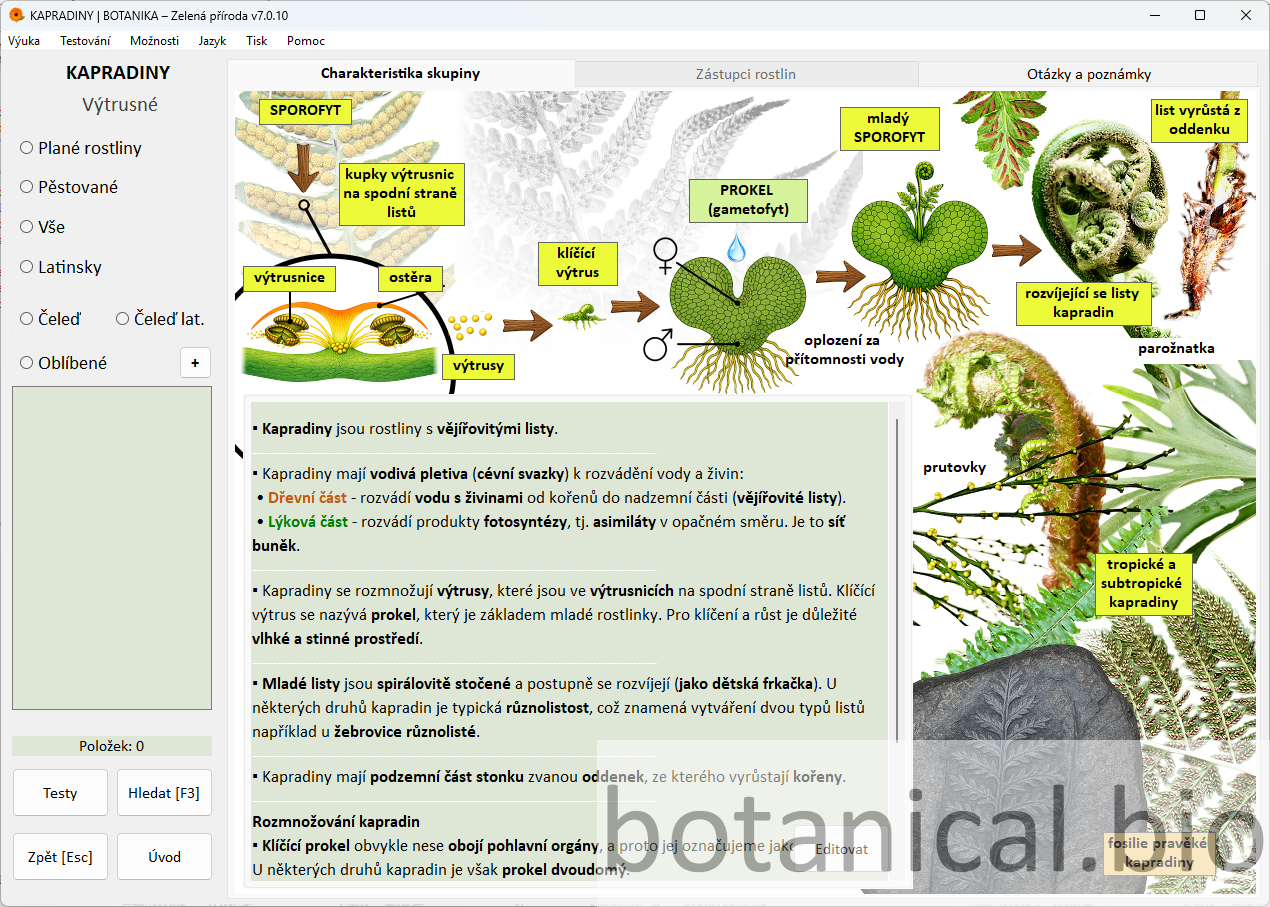
The teacher explains the main characteristics of ferns, their structure and the principle of alternation of generations. Students connect concepts with images and understand that ferns reproduce differently from seed plants.

  • explanation of main fern structures
  • demonstration on images or diagrams
  • step-by-step explanation of alternation of generations
  • checking understanding through targeted questions
Questions:
• Which parts of the fern can you identify?
• Where are the sporangia located and what is their function?
• What is a gametophyte and why is it important?
• What is the difference between sporophyte and gametophyte?
Option A: The teacher explains the content using the screen and involves students with short questions.
Option B: Students identify plant parts in images and write key concepts in their notes.
+ Advanced: Extend with comparison to mosses or seed plants.
– Support: Focus on basic terminology and simplified diagrams.
The overview shows fern structure and basic life cycle.
15–20 min Representatives

Working with representative plants

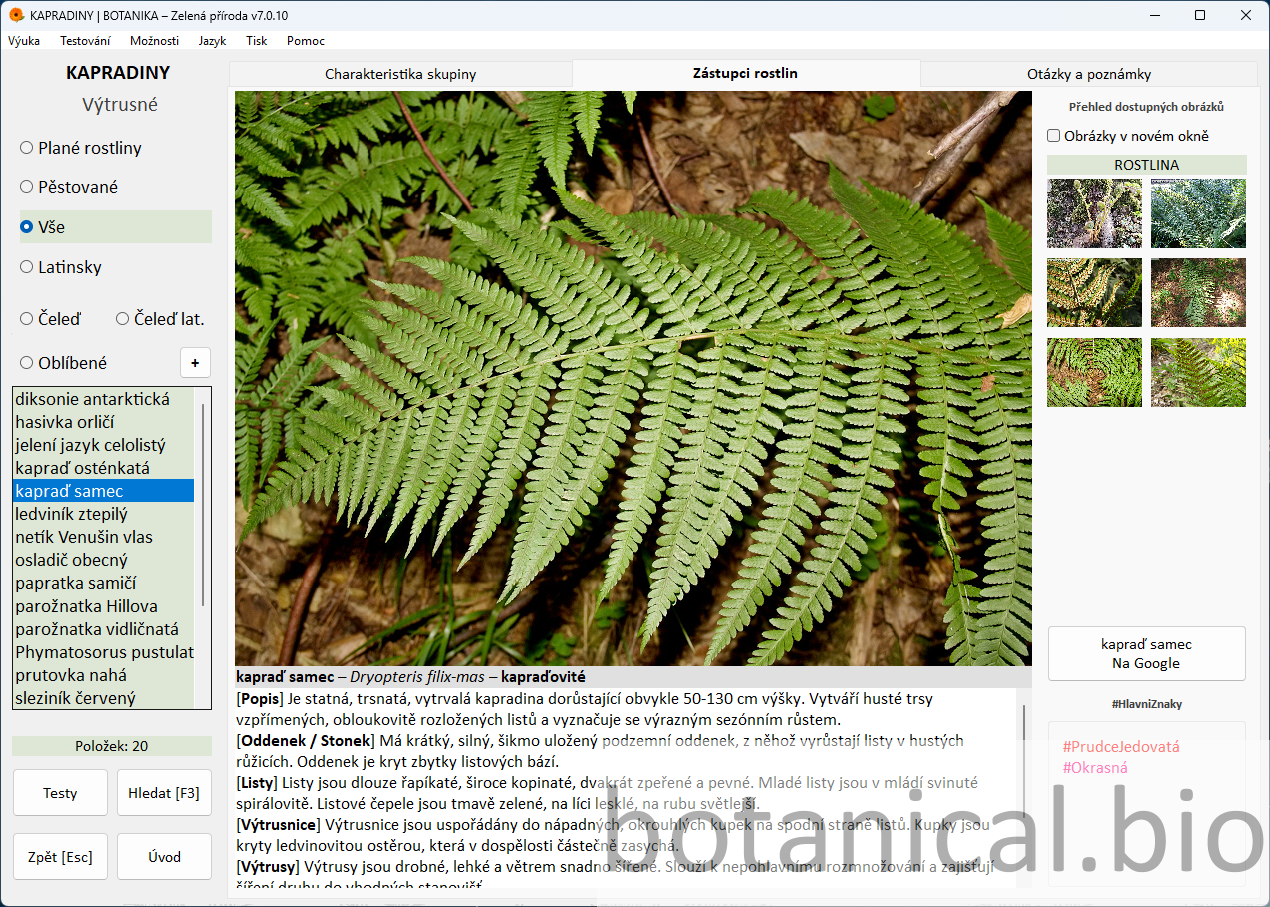
Students work with specific fern representatives and connect theoretical knowledge with observation of plant features. The teacher highlights both common traits and differences among species.

  • select 1–3 representatives
  • observe features in images and descriptions
  • compare plants
  • identify key classification traits
Questions:
• Which features confirm this is a fern?
• Which parts of the plant can you identify?
• How does this species differ from another?
• How would you describe the plant in your own words?
Option A: The teacher selects plants and guides observation.
Option B: Students work independently or in pairs and complete simple tasks like identifying features or comparing species.
+ Advanced: Compare multiple representatives or propose classification criteria.
– Support: Focus on one or two examples.
The representatives section links images with descriptions.
20–25 min Practice

Questions and notes

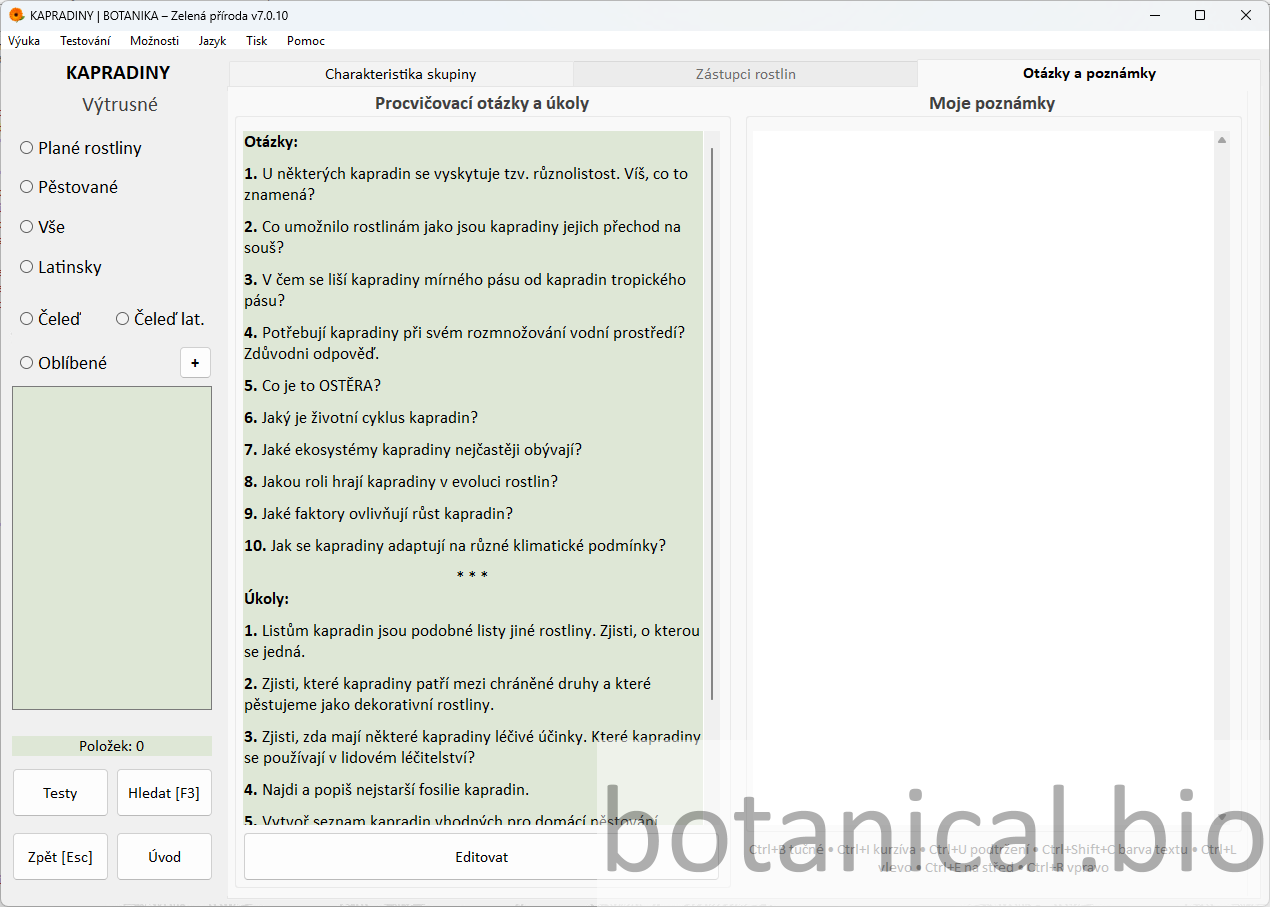
The teacher uses practice questions and tasks to verify whether students understand the key concepts and main characteristics of ferns. This part also follows naturally from the previous explanation and helps students formulate answers in their own words.

  • select 3–4 suitable questions for revision
  • students formulate answers in their own words
  • the teacher briefly supplements or clarifies the answers
  • use the notes section to support the summary
Questions:
• What is typical of ferns?
• How does reproduction by spores work?
• What role does the prothallus play?
• Which terms from today’s lesson do you remember?
Option A: Questions are discussed orally and the teacher involves the whole class in finding the answers.
Option B: Students write short answers or notes individually or in pairs and then compare them.
+ Advanced: Add an extra question or let students create their own question for classmates.
– Support: Choose only 2–3 basic questions and answer them together.
Practice questions support active student work and reinforce key concepts.
25–30 min Playful practice

Reinforcing knowledge through a game

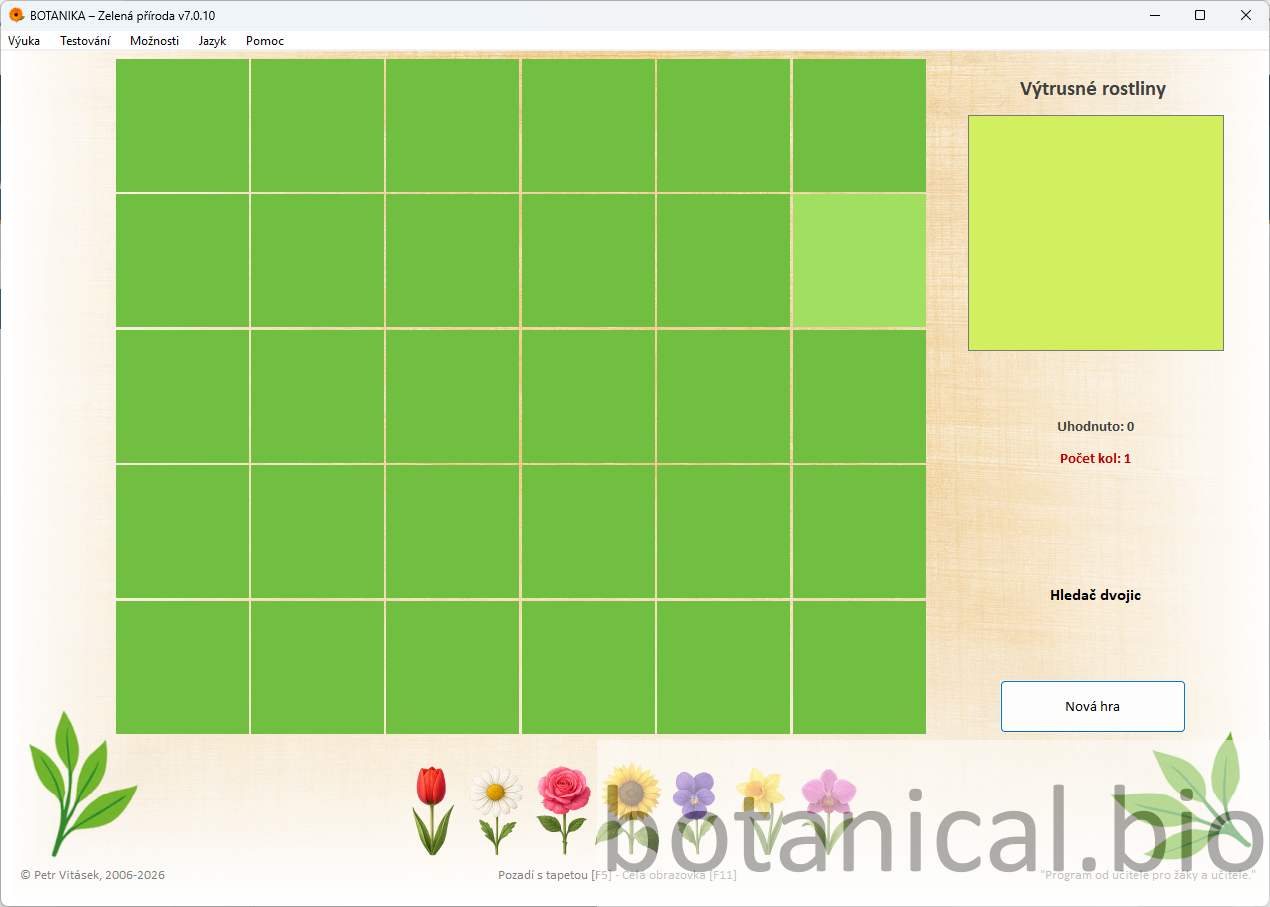
A short activating block using game elements helps reinforce plant recognition and refresh the pace of the lesson. This playful part is especially suitable after a more intensive explanation and question phase because it increases students’ attention and motivation. The memory game can be complemented by additional practice activities in the application or by a custom test prepared by the teacher or the students. The activity can be repeated with different combinations to reinforce plant recognition. The teacher can also ask students to explain which features helped them recognise the plants during the game.

  • choose a suitable activity in the game section of the application
  • carry out a short practice activity focused on plant recognition or key features
  • briefly comment on the process and results together
  • summarise what the activity helped students recall or reinforce
Questions:
• Which plants were you able to recognise correctly?
• What clues helped you decide during the game?
• Which features helped you most when identifying the plants?
Option A: The class plays together and the teacher leads the activity on the board.
Option B: Students work individually or in pairs on their own devices.
+ Advanced: Add a second short activity or ask students to explain the strategy they used to recognise the plants.
– Support: Use only one activity and shorten it if necessary.
The memory game helps reinforce plant recognition and refresh the pace of the lesson.
30–40 min Test

Knowledge assessment

Students apply the knowledge they have gained by completing an interactive test. This part of the lesson verifies whether they understand the main features of ferns, can work with the terminology and are able to connect theoretical knowledge with visual material. While completing the test, students combine what they know about fern structure with orientation in the image and strengthen their understanding of the life cycle.

  • assign the test and explain how it works
  • complete the test individually or together
  • evaluate the correct answers
  • briefly explain mistakes and revise the key concepts
Questions:
• Which feature helped you most when solving the task?
• Where in the image is the required plant part located?
• Which questions did you find the most difficult?
• How did you approach solving the task?
Option A: The test is completed together and the teacher comments on the correct answers as the class proceeds.
Option B: Students complete the test individually or in pairs, followed by a shared evaluation.
+ Advanced: After finishing, ask students to comment on the correct solutions or repeat the test with a different task.
– Support: Go through the test together and explain each step as you proceed.
The test links theory with visual perception and checks understanding of the topic.
40–43 min Botanical key

Demonstration of plant identification using the botanical key

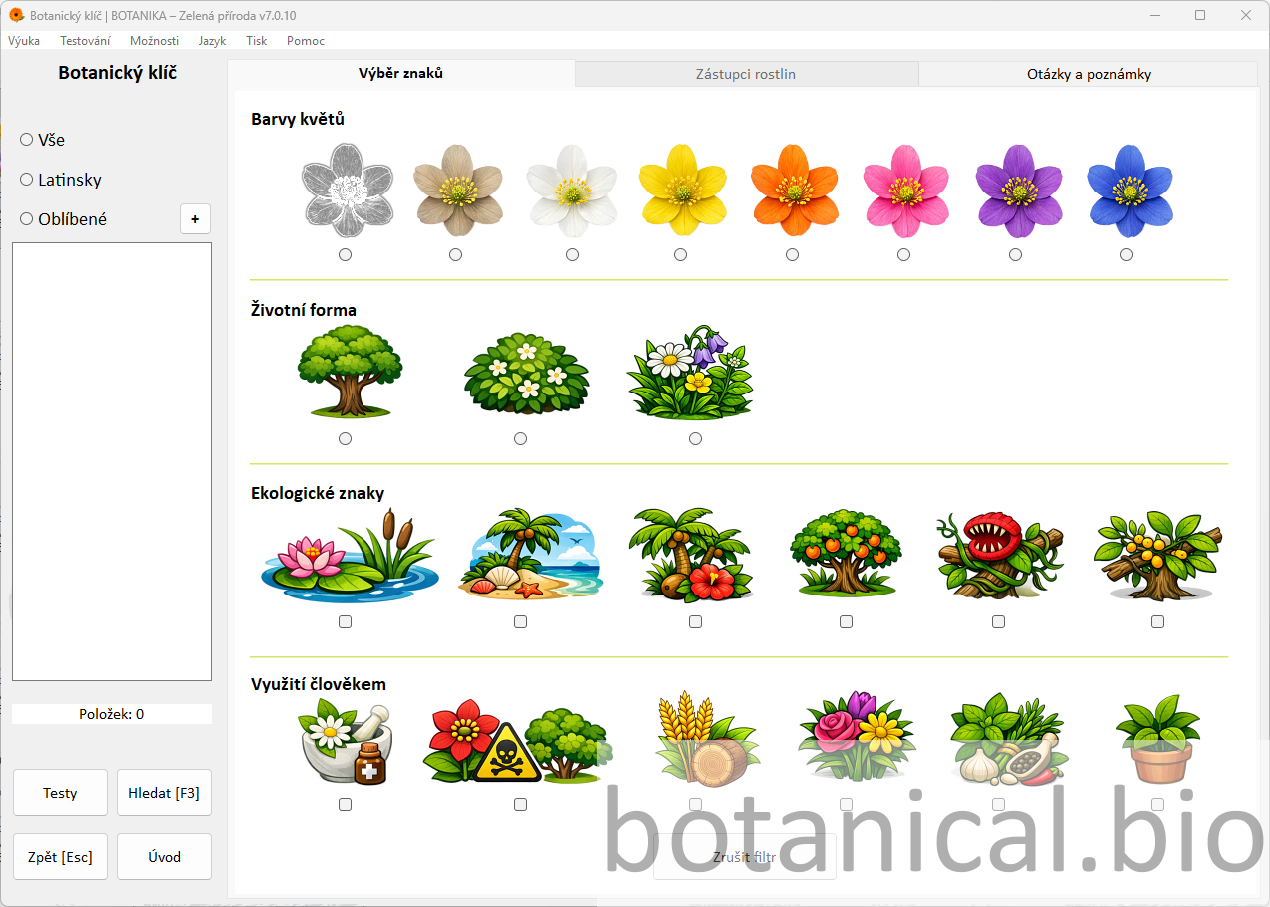
The teacher introduces the digital botanical key as a tool for identifying plants according to their features and thus extends the lesson with a practical application of the knowledge gained. This part helps show that what students learn in the lesson can be used beyond the explanation itself.

  • demonstrate feature selection in the botanical key
  • filter plants according to the selected features
  • identify the species and check the result
  • briefly discuss why the result was correct or what may have been misleading
Questions:
• Which features did you use to identify this plant?
• Why did you choose those particular features?
• Did you reach the same result?
• Which step in the identification process was the most difficult?
Option A: The teacher demonstrates the principle of selecting features and identifies one plant together with the class.
Option B: Students independently or in pairs try to identify a plant according to the given features.
+ Advanced: Let students identify another plant independently or try a different combination of features.
– Support: Proceed step by step with the whole class and explain everything continuously.
The botanical key enables identification by features and links theory with practice.
43–45 min Conclusion

Summary and reflection

The final part of the lesson is used to summarise the main fern characteristics, revise the key terms and briefly reflect on students’ work. The teacher may also follow up with a simple homework task or a suggestion of where students can continue observing ferns in nature.

  • briefly summarise the main features and concepts
  • reflect on students’ work and on the lesson itself
  • optionally assign a follow-up task or suggest observation in nature
Questions:
• What was new or surprising for you today?
• Which fern characteristics will you remember?
• What helped you understand the topic best today?
• Which term could you explain in your own words?
Option A: The summary takes the form of a guided whole-class discussion.
Option B: Students complete a short reflection or write down the main point they have learned from the lesson.
+ Advanced: Add a short extension task, for example identifying suitable habitats for ferns around the school or at home.
– Support: Summarise only the most important findings and ask students to name one remembered concept or feature.
Reflection can use the questions and notes section to support the final summary.

Tips

Combining with traditional explanation

The application can be effectively supplemented with traditional explanation on the board or work with a textbook. It is recommended to explain the basic concepts first and then show them directly in the application.

Working with real specimens

If possible, enrich the lesson with real plants, a herbarium or photographs of ferns from the area around the school. This helps students connect the image in the application with real observation more easily.

Group work

Students can work in pairs or small groups and solve tasks in the application together, compare representatives or search for correct answers in the test or the botanical key.

Printing tests and follow-up practice

Tests can also be used for revision or printed for work without a computer. It is also useful to remind students that the teacher can reuse the tasks when needed or supplement them with an additional worksheet.

Extension through independent research

More advanced students can search for information about ferns, their occurrence or their uses and compare it with the information in the application.

Use of artificial intelligence

Students can use AI to explain concepts or create their own questions. The teacher guides them to verify the answers and express ideas in their own words.

Observing ferns outdoors

The lesson can be supplemented by observing ferns around the school or by using photographs. Students compare real plants with the images in the application and try to recognise their typical features.

Benefits

All in one environment

Atlas, theory, practice questions, tests and the botanical key can be used within one continuous lesson without switching between materials.

Higher student engagement

Visual content, questions and interactive elements keep students engaged and support active participation throughout the lesson.

Flexible use

The methodology can be adapted for whole-class teaching, pair work or individual practice depending on classroom equipment.

Try Botanika

The Botanika – Green Nature application allows teachers to clearly explain even complex biological processes, actively engage students and integrate atlas, theory, practice and assessment into one environment without complicated preparation.